The final steps after the bodywork and main running gear was completed was to put in the reconditioned MG Midget 1275cc engine and gearbox to give me the power of movement. The interior was finished and all the knobs and switches added as well as Metro GTi seats which are only temporary but are comfortable and adjustable. Daylight lights ensure that I (well Matt) won't get fined in the countries where these are required. All that now needs to be done is complete the interior and fill the tank!
Tuesday, 27 January 2015
An Overland Traveller is born - Almost!
So the time has finally come when my restoration and customisation is nearly complete and I am back on the road and now fundraising has started with my birthday party on the 24th January where we raised over £1,000 for Sue Ryder St John's Hospice in Moggerhanger (well done everyone!)
The final steps after the bodywork and main running gear was completed was to put in the reconditioned MG Midget 1275cc engine and gearbox to give me the power of movement. The interior was finished and all the knobs and switches added as well as Metro GTi seats which are only temporary but are comfortable and adjustable. Daylight lights ensure that I (well Matt) won't get fined in the countries where these are required. All that now needs to be done is complete the interior and fill the tank!
Sunday, 14 December 2014
Rebuilding - Underway
Now most of me has been painted, in what I understand is Chevy Yellow, the rebuilding has started and bits are staring to be put onto my lovely new shell.
The wood, an integral part of the structure, has been put on to allow it to be fitted as it seems while the wood maybe perfect I apparently am not and so things like rear wings need to be 'encouraged' to fit
Wood is covered with masking tape to protect it while being initially fitted. What a difference this makes I'm now beginning to look like a car again!.
Once the wood's been fitted the rear wings were put on and it seems took a lot of encouragement by Martin to be made to fit. But after some persuasion, judicious knocking around and then a bit of filler and sanding I have rear wings that are ready to paint..
The long range tank has now been delivered!! Yay!! It looks absolutely brill. It fits (now that 20mm was shaved off the width) and looks just like the drawing.
The tank has been filled with safety foam which is designed to prevent vapour build up. It has been positioned so that the weight is where it would be when people would be in the back seat of the car. Also it makes good use of the space wasted through folding down the rear seat.
As well as making final preparation on the body, work has started on putting 'stuff' on. The loom is now in place (sort of) and front suspension and brakes are also going on hopefully things are will start really escalate once Rod has completed the engine and the rear springs have been received. Anyway I'm really pleased with the way this is all working out.
The wood, an integral part of the structure, has been put on to allow it to be fitted as it seems while the wood maybe perfect I apparently am not and so things like rear wings need to be 'encouraged' to fit

The tank has been filled with safety foam which is designed to prevent vapour build up. It has been positioned so that the weight is where it would be when people would be in the back seat of the car. Also it makes good use of the space wasted through folding down the rear seat.
As well as making final preparation on the body, work has started on putting 'stuff' on. The loom is now in place (sort of) and front suspension and brakes are also going on hopefully things are will start really escalate once Rod has completed the engine and the rear springs have been received. Anyway I'm really pleased with the way this is all working out.
Thursday, 20 November 2014
Painting - Sorted
At last, I'm yellow again!! You have to agree I look luverly! After lots of hard work by Martin on the body work I am finally painted yellow and reconstruction now begins.
Yellow again! |
From this.. |
To this - Fantastic |
Now the shell is painted the panels just need to be finished and I can start being put back together. Woodwork has arrived and will hopefully go on now so things should progress nicely. Engine is being sorted at the moment and so should be ready to install in a few weeks (would be a nice Xmas present!).
Friday, 31 October 2014
Bodywork - Sorted
When I was first stripped naked and taken back to 'basics' it looked like there wasn't too much to do as to be honest I think I looked pretty good. Shot blasting revealed some more parts (or lack of) that needed some addressing so not was all as first seemed.
After getting to grips with things the shell work progressed reasonably well but as anyone who has been in hospital knows not fast enough as all you want is to get out of there. Anyway Martin, Jonathan's body man, got down to it and has now pretty much completed all the body work with the panels all done and being etched ready for painting. In fact I now have wheels on although they'll need to come off while I'm being beautified. Hopefully next set of pictures will be me in all my glory.


After getting to grips with things the shell work progressed reasonably well but as anyone who has been in hospital knows not fast enough as all you want is to get out of there. Anyway Martin, Jonathan's body man, got down to it and has now pretty much completed all the body work with the panels all done and being etched ready for painting. In fact I now have wheels on although they'll need to come off while I'm being beautified. Hopefully next set of pictures will be me in all my glory.
Long range tank - Sorted
As anyone following Matt's blog will know our route takes us across some rough terrain in some pretty remote areas so we decided I needed a long range tank. I suppose we could have simply left the old tank (or maybe a slightly larger one) in place and used Jerry cans but there were a couple of issues with that. The first and most obvious is that the Jerry cans will take up storage space and without having details of where we could fill up I'd probably need two or three to be safe and storage space may well be a premium, I'm not really that big after all.
The second issue was that the petrol tank is mounted through a hole positioned at the rear of my body shell. The issue here is that the tank would need some form of protection to make sure that rocks and rough roads can't damage it or worse still put a hole in it.
The solution to this is actually quite easy and you will see from the design posting we plan to place this where the rear seats would have been folded into.
With a little help from Jonathan the design we came up with was a 160 litre alloy tank which is filled with safety foam to make it safe and prevent the build up of fumes.
The internal pipes (shown in green) will allow the petrol pump to suck up petrol from either side of the tank straddling the prop shaft tunnel. This tank when full should hopefully give me a range of around 1,000 miles at 30 mpg. I'm estimating a low mpg as when the tank is full it'll be the same weight as two people in the back seat and I don't suppose I'd get much more than that. If I do it'll be a bonus.

The solution to this is actually quite easy and you will see from the design posting we plan to place this where the rear seats would have been folded into.
With a little help from Jonathan the design we came up with was a 160 litre alloy tank which is filled with safety foam to make it safe and prevent the build up of fumes.
![]() |
The actual drawing for fabricators |
![]() |
Jonathan's contribution |
The internal pipes (shown in green) will allow the petrol pump to suck up petrol from either side of the tank straddling the prop shaft tunnel. This tank when full should hopefully give me a range of around 1,000 miles at 30 mpg. I'm estimating a low mpg as when the tank is full it'll be the same weight as two people in the back seat and I don't suppose I'd get much more than that. If I do it'll be a bonus.
Saturday, 6 September 2014
design decisions - sorted
Whilst lying here in bits waiting for Jonathan to do his magic and put me back together and make me as good (no better) than new, I've been thinking about some of the changes needed to make sure I am in a fit state for this insane adventure I seem to have been conscripted into.
Some of the challenges we (I) need to address is the range on a tank of petrol. My standard tank is 6.5 gallons and if I get the best mpg possible I may just about squeeze 280 miles out of a tank but that assumes good roads and not that much weight for me to carry. If any of you reading this know Matt then you know I'm on a hiding to nothing there trying to reduce weight then.
Anyway even if I could get the most out of a tank and install a 9.5 gallon tank which is the biggest standard tank we can get I don't think we would have enough range for some of the countries where petrol stations are few and far between, so additional capacity is required. What's the problem, take jerry cans I hear you say, but have you any idea how awkward these things are? So, what's the solution you ask. A bloody great big tank I say. Where the hell are you going to put that you say. Ah ha! I say using a cunning plan I have worked out how to install a tank that will give me a range of around 1,100 miles at 30mpg. Bloody hell I hear you say how have you done that?
Well, given that there's only going to be Matt and Sarah the plan was always going to be to fold away the back seat and use my full capacity for carrying 'stuff'. And there is the solution. Put a tank where the back seat is and use that space for a sodding great big tank!
So, in order to install a large, very large, capacity tank whilst also having loads of storage for everything we (well Matt and Sarah) are going to need to take I (yes, I) have come up with this cunning design and so the Overland Traveller is born.
The petrol tank sits underneath a raised floor which creates an additional storage area for a second spare wheel. A standard petrol tank base will replace the old petrol tank creating a storage area for tools. One spare wheel, the jack and some spares will be stored in the original void below the floor. A second floor going the length of the car creates a base for the main storage area. A bulkhead separates the storage from the 'cab' and is used to create a storage area that can have shelves for smaller items such as food, cooking utensils etc. The larger storage area at the rear will be used for large items.
Paul and Matt visited recently and mocked up the petrol tank to make sure it goes in and to check the measurements Matt took using Carl's traveller. It seems he didn't screw it up all together and the idea works OK although it does look like it takes up loads of room you will be surprised that once I get put back together you won't even notice the space it takes up.
Paul's going to make the tank for me and Carl says he's happy to do the interior woodwork so once Mark has finished knocking me about and I can get painted, Jonathan can put me back together again.
I hope everyone has received an invite to our first fundraising event in January and that I'll see you all there. So put the 24th in you diaries now and be at the Coach House, Potton at 12 o'clock when all the fun starts. See you then
Some of the challenges we (I) need to address is the range on a tank of petrol. My standard tank is 6.5 gallons and if I get the best mpg possible I may just about squeeze 280 miles out of a tank but that assumes good roads and not that much weight for me to carry. If any of you reading this know Matt then you know I'm on a hiding to nothing there trying to reduce weight then.
Anyway even if I could get the most out of a tank and install a 9.5 gallon tank which is the biggest standard tank we can get I don't think we would have enough range for some of the countries where petrol stations are few and far between, so additional capacity is required. What's the problem, take jerry cans I hear you say, but have you any idea how awkward these things are? So, what's the solution you ask. A bloody great big tank I say. Where the hell are you going to put that you say. Ah ha! I say using a cunning plan I have worked out how to install a tank that will give me a range of around 1,100 miles at 30mpg. Bloody hell I hear you say how have you done that?
Well, given that there's only going to be Matt and Sarah the plan was always going to be to fold away the back seat and use my full capacity for carrying 'stuff'. And there is the solution. Put a tank where the back seat is and use that space for a sodding great big tank!
So, in order to install a large, very large, capacity tank whilst also having loads of storage for everything we (well Matt and Sarah) are going to need to take I (yes, I) have come up with this cunning design and so the Overland Traveller is born.
![]() |
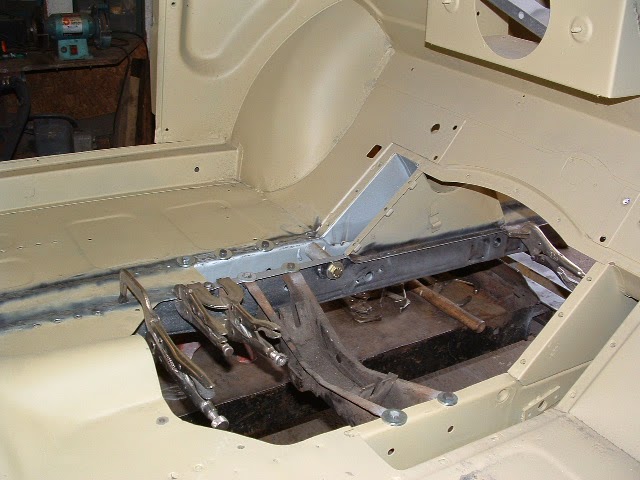
Albert's overland interior |
![]() |
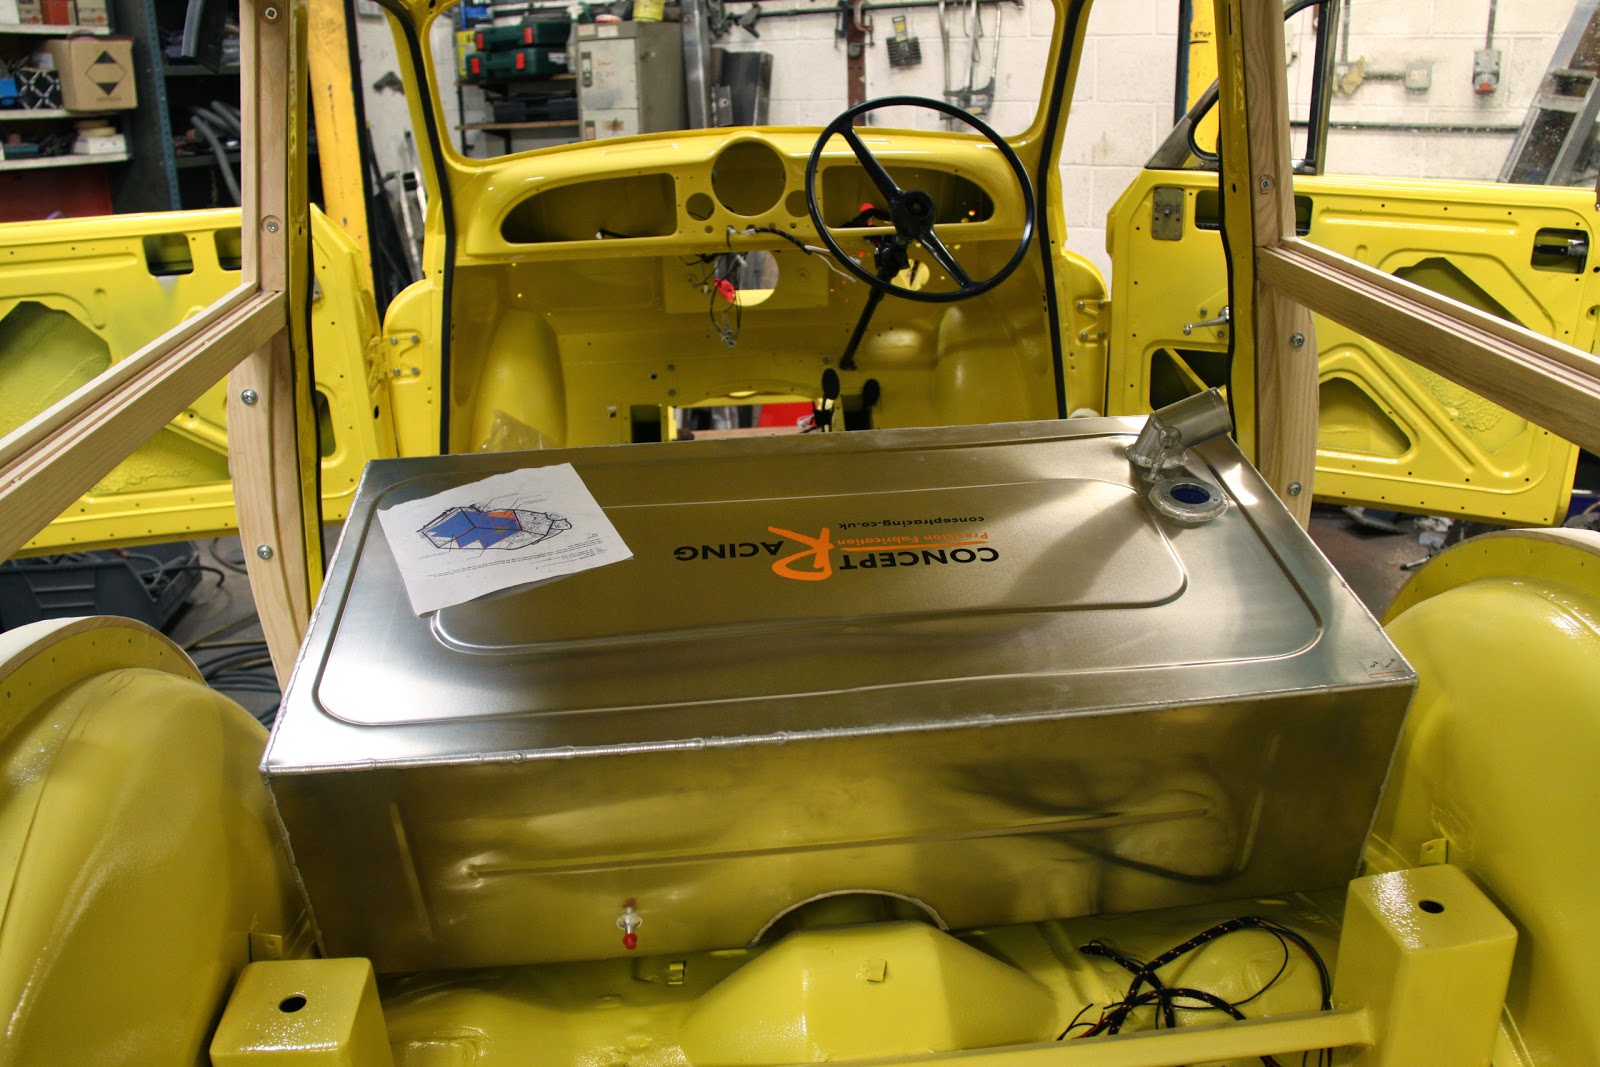
Petrol tank mock up fitted and size verified as OK |
Paul's going to make the tank for me and Carl says he's happy to do the interior woodwork so once Mark has finished knocking me about and I can get painted, Jonathan can put me back together again.
I hope everyone has received an invite to our first fundraising event in January and that I'll see you all there. So put the 24th in you diaries now and be at the Coach House, Potton at 12 o'clock when all the fun starts. See you then
Friday, 1 August 2014
the transformation begins
As you may be aware Matt decided to leave me at JLH Morris Minor for Jonathan to start working on my suspension and some other mechanical work but I've had time to talk Jonathan round to ignoring what Matt wants and to go with my idea which is a total transformation rather than doing bits and pieces. Fortunately Jonathan after looking around my bottom parts agreed that it would not be sensible to do only the mechanicals and suspension as doing the suspension would actually compromise my already fragile wooden bits and as a result if I hit a big bump I'd probably fall apart.
In fact I did start falling to apart when Jonathan started playing around with my suspension and some of my wooden bits dropped off. He also discovered that the front cross member was welded, rather than bolted, on and so there was some unexpected additional work to be done to make the suspension good to go.
It soon became obvious that simply taking everything off and starting the full transformation now would actually be cheaper in the long run than doing my body work at a later date, assuming I survived the journey to Mongolia and back in one piece. As Matt was away I made the decision for him and as it's not my money it was a reasonably easy decision to make.
So, decision made Jonathan's boys took me apart and have started to make good my main body shell. This work has involved doing some patching, sand blasting and doing some etching ready for an initial paint job once the little bits and pieces that came to light are sorted.
The next stage will be to get my bodywork completely sorted and painted and then add back the important bits like the engine, gearbox, suspension and everything needed to make me a whole car once again.
Jonathan estimates I'm going to be indisposed for some months now but that'll give Matt time to work out what he wants doing to make sure we can complete our challenge successfully.
It's going to be really great watching Matt's face when he finds out what's been going on while he has been away. Will keep everyone up to date with my transformation over the coming months.
In fact I did start falling to apart when Jonathan started playing around with my suspension and some of my wooden bits dropped off. He also discovered that the front cross member was welded, rather than bolted, on and so there was some unexpected additional work to be done to make the suspension good to go.
![]() |
Front suspension removed |
So, decision made Jonathan's boys took me apart and have started to make good my main body shell. This work has involved doing some patching, sand blasting and doing some etching ready for an initial paint job once the little bits and pieces that came to light are sorted.
The next stage will be to get my bodywork completely sorted and painted and then add back the important bits like the engine, gearbox, suspension and everything needed to make me a whole car once again.
Jonathan estimates I'm going to be indisposed for some months now but that'll give Matt time to work out what he wants doing to make sure we can complete our challenge successfully.
It's going to be really great watching Matt's face when he finds out what's been going on while he has been away. Will keep everyone up to date with my transformation over the coming months.
Subscribe to:
Posts (Atom)